
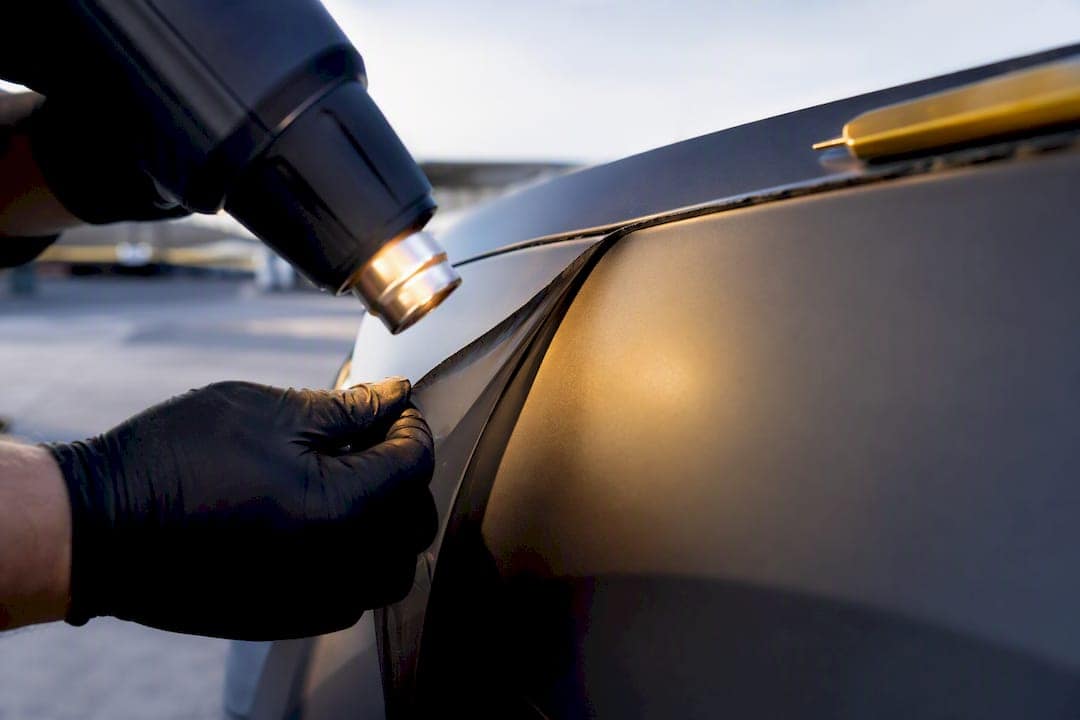
The safest DIY way to remove a vinyl car wrap is to warm each panel with controlled heat, peel low and slow at a 15° to 45° angle, then dissolve leftover adhesive with a slow-evaporating remover and finish with a 50/50 isopropyl alcohol wipe. Before touching the whole car, test a small hidden section first. If the paint history is unknown, the wrap is over five years old, or the film feels brittle, stop and call a professional instead.
TL;DR:
- Vinyl wrap removal is safest when performed on panels under 5 years old, with known paint condition, and when the film is not brittle or cracked.
- Using controlled heat (120°F to 176°F) and flexible tools prevents paint damage and ensures a cleaner peel, especially on high-quality cast vinyl.
- For stubborn adhesive residue, applying a slow-evaporating remover followed by an isopropyl alcohol wipe minimizes damage and prepares the surface for re-coating or rewrapping.
- Professional removal is recommended for older or brittle wraps, or where paint history is unknown, to avoid costly paint repair or clear coat damage.
- DIY enthusiasts should start with thorough washing, masking trim, and incremental heating, but must recognize when to stop and consult a pro to prevent irreversible damage.
Work in a ventilated garage or open driveway, never a sealed space, since adhesive removers and heated vinyl both release fumes. Skip open flames entirely, that includes torches and space heaters near the work area. Mask off rubber trim, weatherstripping, and plastic emblems with painter’s tape so hot air and solvents do not warp or discolor them.

Certain paint conditions raise your risk of damage. Factory matte finishes, a car with a known respray, or panels with prior dent repair are all more likely to lift or discolor under heat than an untouched factory clear coat. A wrap older than five years, or one that looks cracked and alligatored, tends to shred rather than peel cleanly, which drags the job out and increases the odds of scraping too hard.
Know when to walk away. If you see clear coat lifting, paint flaking, or adhesive spreading into a gummy mess that will not release, stop working immediately and get a shop to look at it.
Pro Tip: Do a full decontamination wash before you apply any heat. Skipping this step lets grit trapped in the old wrap drag across your clear coat the moment you start peeling, leaving faint scratches you will not notice until the sun hits the panel just right.
An adjustable heat gun is the standard tool for most DIY jobs, but a wallpaper steamer or infrared lamp works too, and some installers prefer them for evener heat distribution. Whatever you use, aim for roughly 120°F to 176°F (50°C to 80°C) at the panel surface. That range makes the adhesive pliable without cooking the clear coat underneath.
For lifting and scraping, stick to plastic. Metal blades gouge paint in a fraction of a second, and there is no coming back from that.
An infrared thermometer is optional but genuinely useful. It tells you when a panel has hit working temperature instead of guessing based on how the vinyl looks.
Removal is really a repeating cycle: heat, lift, peel, repeat, panel by panel. Rushing any one step is what causes torn film and gummy adhesive smears.
Cast vinyl from higher-grade product lines tends to come off in long, clean strips even after years on the car, while cheaper calendared film is far more likely to shred, a pattern 3M’s product guidance on film types reflects. If you installed a premium cast wrap originally, expect an easier afternoon. If you are not sure what was used, budget extra time and patience. For paint protection film specifically, steam or moist heat generally outperforms dry heat, since PPF’s urethane construction behaves differently than PVC vinyl under a heat gun.
Pro Tip: Force is the enemy, not speed. If a strip will not release at a low angle, the fix is more heat, not more muscle. Pulling harder is how installers end up with a clear coat delamination story they did not want to tell.
Curious how film age affects this whole process? A wrap’s expected lifespan says a lot about how stubborn removal will be before you even pick up the heat gun.
Peeling the vinyl is only half the job. What is left behind is a thin, sticky adhesive film that needs its own removal process.
Apply a slow-evaporating adhesive remover, in the style of Adhesive-Off Pro, directly to the residue and let it sit. Product guidance from Brothers Chemical recommends a dwell time of 30 to 60 seconds before wiping, and you may need to repeat this two or three times on heavily soiled panels. Work the remover in with a microfiber towel or clean rag, then lift the loosened adhesive with a plastic scraper or squeegee rather than scrubbing it around.
Once the last panel is clean, run one more 50/50 isopropyl alcohol and water wipe over the entire car. This step removes leftover solvent oils that would otherwise interfere with wax, sealant, or a fresh wrap bonding properly.
Follow that with a clay bar or clay towel pass to lift any bonded contamination the wipe missed, then inspect every panel under a bright directional light, a work light held at a low angle shows swirl marks and adhesive ghosting that overhead sun will hide. Light haze or fine swirls usually respond to a machine polish. Actual clear coat lifting, deep scratches, or paint that flaked during removal is a different problem entirely and needs paint correction or a respray, not more elbow grease.
For guidance on keeping clear coat intact through the whole decontamination process, this partner resource on protecting paint during chemical removal work covers the same principles from the ceramic coating side of the industry.
Shops do not start with a heat gun, they start with an inspection. A trained installer checks paint depth readings and looks for signs of prior body work before deciding how much heat and pull force a panel can safely take, because that history changes the entire approach.
Pros also reach for tools most DIYers skip. IR thermometers keep panel temperature consistent across a whole vehicle. Bagging with a chemical softener handles brittle or baked film that would otherwise shred under a heat gun. Steam works better than dry heat on PPF specifically, and decal eraser wheels get run at controlled low speeds that a first-timer would likely push too fast.
That workflow, refined over more than 30 years of combined installation experience, is exactly what separates a clean strip-and-reprotect job from a weekend project that ends at a body shop.
A single panel, done carefully, takes most DIYers two to four hours the first time through, mostly because reheating and re-peeling eats more time than you expect. A full vehicle stretches into a full weekend, sometimes two, especially with curves, jambs, and stubborn adhesive in the mix.
Hiring a pro almost always saves money when the paint history is unknown or the wrap is old and brittle, since a botched DIY peel can turn into a respray bill far higher than a professional removal fee. A reasonable middle ground: do the easy flat panels yourself, then hand off jambs, curves, and any panel that starts shredding to someone with the right tools.
If a panel starts flaking paint the second you apply heat, or you inherited a car with a wrap job and no history on what is underneath it, that is exactly the scenario professional removal exists for. Professional services inspect your paint, identify risk areas before any heat touches the surface, and handle wrap removal alongside protective treatments like paint protection film, ceramic coating, or a fresh vinyl wrap done correctly the first time.
Every job starts with a paint inspection and a straightforward quote, so you can understand the timeline and cost before any work begins. That matters most on older wraps, matte finishes, or any car where a previous owner’s wrap history is a mystery. Rather than risk a clear coat repair bill chasing a DIY shortcut, get your vehicle assessed and see what removal, ceramic coating, or a fresh coat of protection actually costs. Browse our services and request a quote for your vehicle today.
Warm the panel with a heat gun until the vinyl feels pliable, then peel a corner back at a low angle, 15° to 45°, in short strips while reheating as needed. Rushing the peel or skipping heat is what turns an easy job into a shredded, adhesive-covered mess.
High-quality cast vinyl, properly installed, usually peels off cleanly even after several years, while cheaper film or a wrap left on past five years tends to crack and shred. Removal difficulty comes down almost entirely to film quality, age, and how much heat you apply.
Slow-evaporating adhesive removers, such as Adhesive-Off Pro, break down leftover glue with a short 30 to 60 second dwell time before wiping. A final 50/50 isopropyl alcohol and water wipe removes any remaining solvent trace afterward.
For the film itself, a softener like Vinyl-Off loosens brittle or baked-on vinyl, often combined with a bagging technique that traps heat and chemistry against stubborn panels. For the adhesive left behind, a dedicated adhesive remover followed by an isopropyl alcohol wipe finishes the job.
Call a professional if the wrap is over five years old, the paint has an unknown history, or you see any clear coat lifting or paint flaking during your test area. The PPF Company inspects paint condition before removal starts, which catches problems a DIY approach would only discover after the damage is done.