
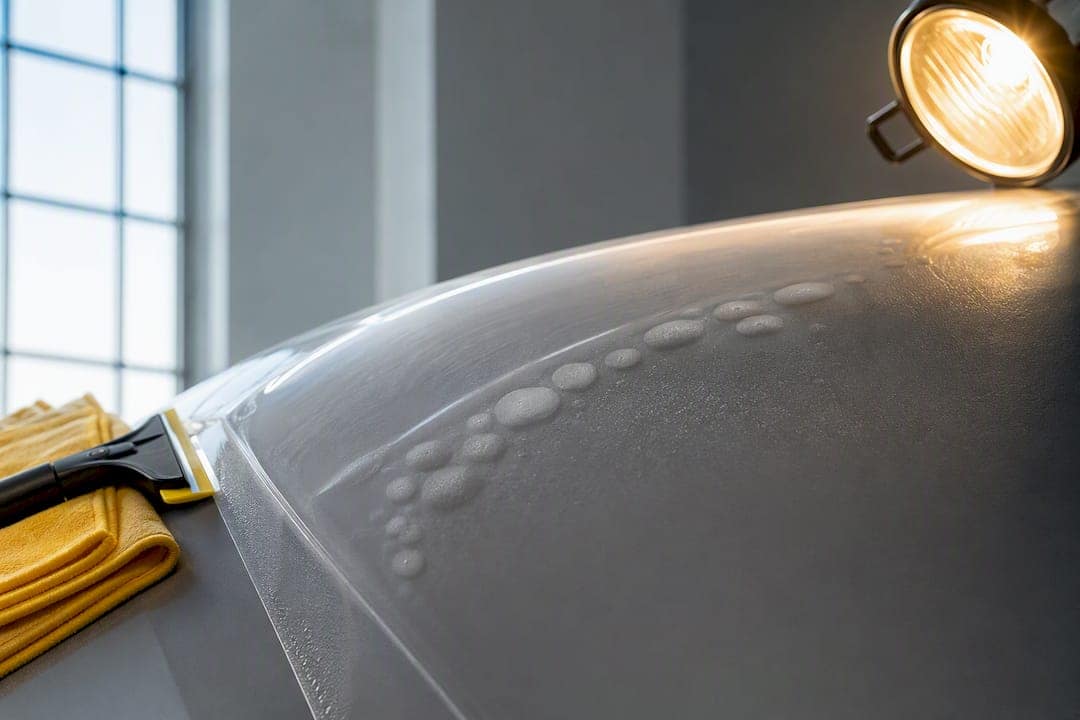
Most bubbles that show up on new paint protection film shortly after installation are trapped moisture, not a failure, and they typically flatten out on their own. If a bubble is hard, growing, or shows up at an edge, that’s a different story and worth a call to your installer. Either way, don’t poke it. Document it with a photo, note the date, and give it time before you assume something’s wrong.
TL;DR:
- Most moisture bubbles under PPF resolve naturally within one to two weeks, especially in warm and dry environments, making patience the best approach.
- Bubbles that do not shrink or grow over several days, or those that lift edges or connect with others, indicate a problem requiring professional inspection or rework.
- Surface contaminants create permanent bumps, while trapped air pockets usually stay round, firm, and unchanged in size over time.
- Proper prevention includes working with installers in dust-controlled environments and ensuring thorough paint correction and surface cleaning before application.
- Poking or puncturing bubbles at home can damage the film and void warranties, so avoid DIY fixes if bubbles persist beyond the expected curing window.
PPF bubbling has four distinct root causes, and knowing which one you’re looking at changes what you should do next.
Temperature and humidity make all of this worse. Cold garages slow moisture evaporation to a crawl, while installs done in dusty, uncontrolled environments raise the odds of trapping debris in the first place.
The visual differences are usually obvious once you know what to look for, and a few days of observation will confirm or rule out most causes.
Pro Tip: Take one photo a day, same angle, same lighting, from the moment you notice a bubble. If you end up calling your installer, that simple timeline is often the single most convincing piece of evidence you can hand them.
Give moisture bubbles time before you worry. In warm, dry conditions, small bubbles can flatten out in as little as 48 hours. Under typical garage conditions, most clear up within one to two weeks. Cool or humid environments slow evaporation further, sometimes stretching the process to three or four weeks.
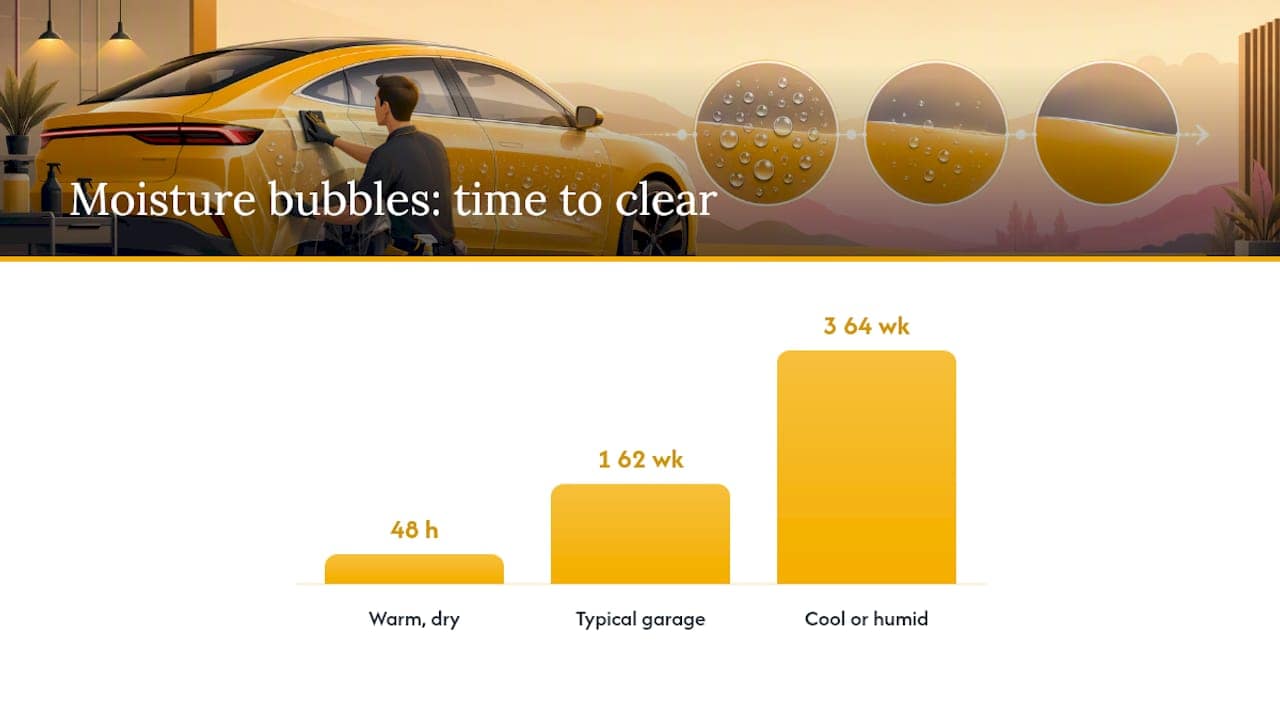
Film thickness and the shape of the panel both affect the timeline. Moisture has a shorter path to escape on a flat hood than it does around a tightly wrapped mirror cap or bumper corner, so bubbles in those tighter spots can take longer even under identical weather.
The practical rule: if a soft, cloudy bubble is still exactly the same size after your climate’s expected window has passed, moisture evaporation likely isn’t the problem anymore. At that point you’re probably dealing with an air pocket, trapped debris, or an adhesive issue rather than something that will resolve with more patience.
There’s very little a car owner should actually do with their hands here. Most of the useful action is patience plus documentation, not tools.
What you should never do is poke, pierce, or puncture the bubble with a pin or needle. That introduces contaminants, damages the film’s structure, and typically voids your warranty on the spot. The same goes for aggressive heat guns, abrasive scrubbing, or solvents you weren’t told to use by the installer.
Pro Tip: If a bubble hasn’t budged after your expected cure window, stop trying home fixes entirely. Continuing to press or heat the film at that point usually just narrows your options when a professional does look at it.
Call your installer once a bubble has passed the reasonable cure window for your climate, or immediately if it’s growing, connecting with other bubbles, or lifting an edge.
Prevention happens almost entirely before the film ever touches your paint, which is why the shop you choose matters more than any product you buy afterward.
None of this guarantees zero bubbles ever, but it removes the two most common causes: dirty prep and an uncontrolled install environment.
This guidance comes out of more than 30 years of combined hands-on experience installing paint protection film at The PPF Company, where diagnosing the difference between a curing artifact and a real defect is a routine part of the job, not a rare event.
Some installers use film with advanced self-healing technology, which affects how bubbles and minor surface disruptions behave over the life of the film, and combine PPF work with ceramic coatings and window tinting for owners who want fuller protection against UV damage and everyday wear. The detailed maintenance guidance The PPF Company publishes reflects the same batch tracking and installation-versus-material diagnostic approach covered in this article: checking panel patterns, cure windows, and film batch history before ever recommending a fix.
Most PPF content treats bubbling as a single problem with a single fix, and that’s the biggest gap in how this topic usually gets covered. A moisture bubble and a debris bump look similar to an untrained eye, but they call for completely different responses. Waiting out a debris bump wastes two weeks you could have spent getting it reworked. Panicking over a moisture bubble on day three gets people reaching for needles they shouldn’t touch.

The overrated piece of advice floating around forums is the “just pop it” fix. It works exactly once, on exactly the wrong bubble, and then you’re paying for a full panel replacement instead of a five-minute inspection. What actually matters is timeline discipline: know your climate’s expected cure window, photograph what you see, and use size change over days as your real diagnostic tool rather than guessing from a single glance.
If there’s one thing worth prioritizing above everything else in this guide, it’s picking an installer whose prep process you can actually ask about before the film ever goes on. Prevention is cheaper and less stressful than any fix.
If a bubble on your film has outlasted the normal cure window, or it’s growing instead of shrinking, The PPF Company can run a proper diagnostic inspection and tell you exactly whether you’re looking at a curing artifact or a real defect. Depending on what the inspection finds, the fix might be a simple spot rework, an edge reseal, or a full panel reinstall.

Before you book, pull together your dated photos, the date the film went on, and a quick note on anything unusual since then, a car wash, a cold snap, a long stretch parked in direct sun. That timeline is exactly what a technician needs to diagnose the cause quickly instead of guessing. The PPF Company also handles ongoing maintenance for film that’s already cured properly, so you’re covered whether this is a fresh install issue or a years-later check-up. Head to Our Services to see inspection and repair options, or book directly if you’re ready to get it looked at.
For more on failure modes, curing science, and safe fixes, see the PPF defects and installation guide and the curing process breakdown.
Small, soft moisture bubbles usually flatten out on their own within one to two weeks as trapped liquid evaporates through the film. Hard or growing bubbles won’t resolve without professional rework.
Most film fully settles within one to two weeks in normal conditions, though warm and dry climates can cut that to 48 hours while cool or humid ones can stretch it to three or four weeks.
Genuine air bubbles, as opposed to moisture, don’t shrink over time and generally require an installer to lift the film and reapply it with proper squeegee technique or heat. Poking the bubble at home risks damaging the film and voiding your warranty.
Swirl marks visible under film usually trace back to paint correction that was skipped or rushed before installation, and once the film is on, they typically can’t be fixed without removing and reinstalling it. The PPF Company addresses this at the source by including paint correction in its pre-install prep to avoid the problem entirely.
Call as soon as a bubble grows, connects with another bubble, lifts at an edge, or is still present after your climate’s expected cure window has passed. Bring dated photos and a timeline of when you first noticed it.