


Yes, in almost every case, you should correct your paint before installing PPF. Here’s why that order matters so much: PPF is a sealant as much as it’s a shield. Whatever swirls, water spots, or haze sit under the film on install day get locked in for the film’s entire lifespan, which typically runs 5 to 10 years.
There are two situations where you can ease off. If you’re only covering impact zones like the front bumper and rocker panels for rock-chip protection, and those panels are genuinely clean, a light polish may be all you need. And if you just drove a new car off the lot with paint that’s actually flawless under inspection, you might skip ahead to prep. But “looks clean in the driveway” and “actually clean” are two different things, and that gap is where most owners get burned.
Before you book anything, do three things:
Correcting paint before PPF installation prevents permanently sealing swirls, haze, and water spots under film that lasts 5 to 10 years.
| Point | Details |
|---|---|
| Default to correction | Correct paint before PPF in nearly every case, since film seals in whatever defects exist underneath. |
| Inspect under LED light | Daylight hides swirls and haze that become obvious once film adds a glossy top layer. |
| Time it tight | Schedule correction the day before or same day as PPF install to avoid new marring creeping in. |
| Match cost to goals | Budget $400 to $1,500 for correction depending on stage, and skip it only for impact-only coverage or truly flawless new paint. |
| Choose a shop that measures | Ppf bundles decontamination, LED inspection, paint-thickness measurement, and correction into every PPF package across Calgary and Winnipeg. |
The short answer is that correction changes what the film locks in, and that’s the whole game. PPF is optically clear, but clear isn’t the same as invisible. Under direct sun or garage lighting, film actually amplifies fine swirl marks and holograms because it adds a glossy top layer over whatever texture already exists in the clear coat. Paint that had light haze before install often looks worse once the film goes on, not better, simply because the surface now has an extra reflective layer sitting on top of the defects.
Correction fixes that by leveling the clear coat. A proper polishing pass removes the fine scratches causing swirl reflections and restores the kind of even, deep gloss that makes PPF look factory-fresh instead of like a hazy sticker.
There’s a second, less obvious reason correction matters: adhesion. A surgically clean, level surface gives the film’s adhesive layer more consistent contact area. Installers who work with corrected paint report fewer trapped air pockets, fewer edge lifts, and film that bonds more securely from day one. Contaminants and surface irregularities create tiny gaps the adhesive can’t fill, and those gaps often show up months later as bubbling or peeling at panel edges.
What should you expect from a shop that does this right?
If a shop can’t show you before-and-after proof, that’s worth asking about directly before you commit.
Correction isn’t free, and it isn’t risk-free either. Every polishing pass removes a small amount of clear coat, and clear coat is finite. Aggressive cutting compounds remove more material than a light finishing polish, which is why experienced detailers use paint-thickness gauges before they start, measuring the clear coat and setting safe removal limits before any pad touches the panel.
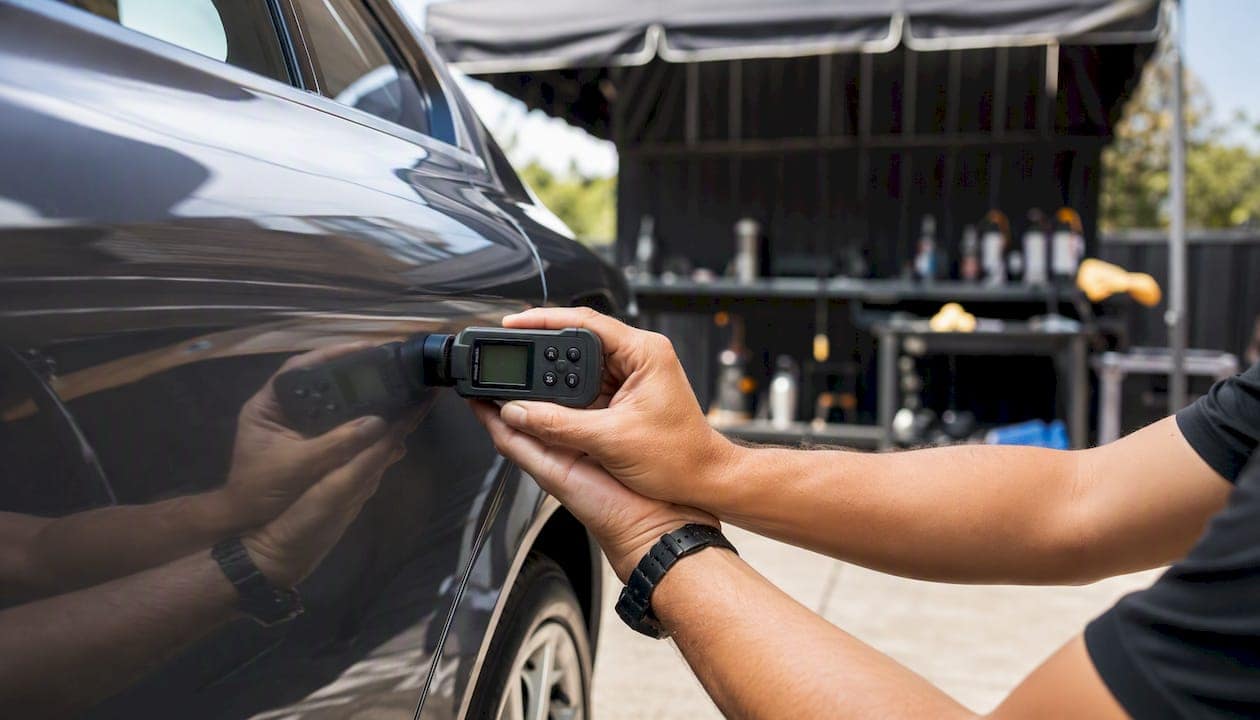
A light Stage 1 enhancement polish removes only fractions of a micron relative to typical clear-coat thickness, which is well within normal variability across most factory finishes. Heavier Stage 2 or Stage 3 correction removes more and should only happen on panels that actually need it, not as a blanket pass across the whole car.
Here’s the tradeoff some shops won’t spell out: skipping correction preserves clear coat today but locks in whatever defects exist for years. If you decide later that you want that haze gone, your only real option is removing the film, correcting the paint, and reinstalling, which costs more in total than doing it right the first time.
There are legitimate reasons a shop might recommend skipping full correction. If your goal is strictly rock-chip protection on a beater commuter, or your budget only covers the film itself, or a panel has damage that needs body work rather than polishing, minimal correction can make sense.
Pro Tip: Never let a shop clay-bar your car without a follow-up polish. Claying alone removes surface contaminants, but the clay itself frequently creates fine marring called clay haze. Sealing that haze under film is arguably worse than leaving the original swirls alone.
Timing has a simple rule: correct as close to install day as possible. Every day between correction and film application is a day where dust, light washing, or an accidental brush against the car can reintroduce fine marring, undoing work you paid for.
A practical two-day schedule most shops follow looks like this:
New cars deserve their own note here. Even brand-new vehicles typically arrive with light swirls from dealer washes and transport handling. A light single-stage enhancement polish is usually enough to remove that marring, and pairing it with PPF within the first 2 to 4 weeks of ownership is one of the most cost-effective windows you’ll get, since the paint hasn’t accumulated years of environmental damage yet.
If your vehicle was recently repainted, whether from body work or a full respray, that’s a different situation entirely. Fresh paint needs time to cure and off-gas solvents before it can be safely polished or filmed. Most body shops recommend waiting at least 30 days before correction on a fresh repaint, and installing film over paint that hasn’t fully cured risks trapping solvent gasses under the film, which can cause hazing or adhesion failure.
Pro Tip: Book your correction and PPF appointment as a single coordinated job whenever possible. Splitting them across separate visits, weeks apart, gives contaminants and re-marring a chance to sneak back in before the film ever goes on.
There’s a real gap between “we’ll clean your car” and the process that reputable shops actually run. Understanding that difference helps you know what you’re paying for.
A proper prep sequence generally includes:
That full sequence is the industry standard among installers who take adhesion seriously, not an upsell.
Before you book, ask your installer:
If the answers are vague or the shop treats these as odd questions, that tells you something.
Budget matters, and the ranges are wide enough that it’s worth knowing them before you get a quote. A light Stage 1 enhancement polish typically runs $400 to $800 and adds 4 to 8 hours to the job. Stage 2 two-step correction runs $800 to $1,500 and adds a full day or two. Multi-step Stage 3 correction, reserved for heavily swirled or neglected paint, starts around $1,500 and can take 2 to 3 days.

Compare that against PPF pricing itself: partial front-end kits start around $1,250, while full-vehicle coverage starts around $3,500 and up. Bundling correction with PPF, and often ceramic coating, usually costs less combined than paying for each service separately, and it’s almost always cheaper than removing film later to fix defects you sealed in by skipping correction the first time.
A few decision rules worth keeping in your back pocket:
No, not in any meaningful way. Once film is on, you can’t polish through it to fix paint defects underneath. The film itself has its own clear-coat layer, and aggressive polishing or solvent-based products will damage the film long before they’d reach the paint.
If a defect turns out to be trapped under film after install, the only real fix is removing the film, correcting the paint properly, and reinstalling new film, since film can’t be reused after removal. On a single damaged panel, targeted replacement of just that section is usually more practical and affordable than redoing the entire vehicle.
Small bubbles that appear shortly after install are often trapped air working itself out and can resolve on their own within a few days. Persistent bubbling, contamination trapped under the film, or lifting edges are different and usually mean a section needs professional attention.
Pro Tip: If you’re unsure whether a mark under your film is trapped debris or a paint defect, hold a flashlight at a low angle. Debris usually casts a distinct shadow; underlying paint defects tend to blur into the surrounding finish instead.
A correction-then-PPF job that’s done right follows a repeatable sequence, and knowing that sequence helps you evaluate any shop you’re considering.
When you’re vetting a shop, look for these signals:
Bundling correction, PPF, and an optional ceramic coating on top often delivers the best long-term value, since the coating adds UV resistance and easier maintenance on top of the film’s physical protection. Ask any shop how many years of combined experience their team has and how many vehicles they’ve corrected and filmed. Real numbers, backed by real photos, tell you far more than a sales pitch ever will.
Most complaints about PPF looking “off” trace back to one thing: someone skipped correction to save a day or a few hundred dollars, and the swirls that were barely visible before install became obvious the moment the film went on. The shops that get repeat customers are the ones that measure paint thickness, show you photos before they touch a pad, and refuse to rush the two-day sequence just because a customer is in a hurry.
The verdict doesn’t change from car to car: correct first, film second, and don’t let anyone talk you out of the order.
Ppf builds correction directly into the PPF process instead of treating it as an optional upsell tacked onto your invoice. Every vehicle gets a full decontamination pass, LED inspection, paint-thickness measurement, and correction to whatever stage the paint actually needs, followed by the wipe-down protocol that sets film up to bond properly the first time.
With over 30 years of combined experience across the team and a documented portfolio of before-and-after work, Ppf serves vehicle owners across Calgary and Winnipeg who want the film to look sharp on day one, not just protected. Packages bundle correction and installation into a single quote, with ceramic coating available as an add-on for owners who want UV protection and easier washing on top of the film itself, plus options like rear quarter window guards for enhanced vehicle protection. If you’re ready to see what your paint looks like under proper LED inspection, book a quote through the Calgary PPF page or check availability at the Winnipeg location to get a straight answer on what your specific vehicle needs before film goes on.
For deeper technical detail beyond this guide, these sources cover installer-level specifics worth reviewing:
Always check your film manufacturer’s official installation guidelines alongside advice from a reputable local detailing shop before making a final decision.
Undamaged factory paint doesn’t need a cure period and can be corrected and filmed right away. Freshly repainted panels typically need at least 30 days to cure before correction or film installation to avoid trapping solvent gasses.
No. Once film is installed, you can’t polish through it to reach the paint underneath without damaging the film’s own clear-coat layer. Fixing trapped defects requires removing and reinstalling the film after correcting the paint properly.
Not exactly. Buffing is one technique used during correction, but the full process includes decontamination, inspection, paint-thickness measurement, and staged polishing chosen based on what defects are actually present.
Not immediately. Freshly painted panels need time to cure, generally at least 30 days, before film goes on, since solvents still off-gassing from the paint can get trapped under the film and cause hazing or adhesion problems.
It depends on your goal. If you want maximum visual finish, correct the full vehicle; if you’re only covering impact zones for chip protection, a thorough decontamination and IPA wipe from a shop like Ppf may be enough.

Calgary
Winnipeg
Calgary
Winnipeg